
TLDR;
We are introducing Armory, a tool that adds a database backend to dozens of popular external and discovery tools. This allows you to run the tools directly from Armory, automatically ingest the results back into the database and use the new data to supply targets for other tools.
Why?
Over the past few years I’ve spent a lot of time conducting some relatively large-scale external penetration tests. This ends up being a massive exercise in managing various text files, with a moderately unhealthy dose of grep, cut, sed, and sort. It gets even more interesting as you discover new domains, new IP ranges or other new assets and must start the entire process over again.
Long story short, I realized that if I could automate handling the data, my time would be freed up for actual testing and exploitation. So, Armory was born.
What?
Armory is written in Python. It works with both Python2 and Python3. It is composed of the main application, as well as modules and reports. Modules are wrapper scripts that run public (or private) tools using either data from the command line or from data in the database. The results of this are then either processed and imported into the database or just left in their text files for manual perusal.
The database handles the following types of data:
- BaseDomains: Base domain names, mainly used in domain enumeration tools
- Domains: All discovered domains (and subdomains)
- IPs: IP addresses discovered
- CIDRs: CIDRs, along with owners that these IP addresses reside in, pulled from whois data
- ScopeCIDRs: CIDRs that are explicitly added are in scope. This is separated out from CIDRs since many times whois servers will return much larger CIDRs then may belong to a target/customer.
- Ports: Port numbers and services, usually populated by Nmap, Nessus, or Shodan
- Users: Users discovered via various means (leaked cred databases, LinkedIn, etc.)
- Creds: Sets of credentials discovered
Additionally, with Basedomains, Domains and IPs you have two types of scoping:
- Active scope: Host is in scope and can have bad-touch tools run on it (i.e. nmap, gobuster, etc.).
- Passive scope: Host isn’t directly in scope but can have enumeration tools run against it (i.e. aquatone, sublist3r, etc.).
If something is Active Scoped, it should also be Passive Scoped. The main purpose of Passive scoping is to handle situations where you may want data ingested into the database and the data may be useful to your customers, but you do not want to actively attack those targets. Take the following scenario:
You are doing discovery and an external penetration test for a client trying to find out all of their assets. You find a few dozen random domains registered to that client but you are explicitly scoped to the subnets that they own. During the subdomain enumeration, you discover multiple development web servers hosted on Digital Ocean. Since you do not have permission to test against Digital Ocean, you don’t want to actively attack it. However, this would still be valuable information for the client to receive. Therefore you can leave those hosts scoped Passive and you will not run any active tools on it. You can still generate reports later on including the passive hosts, thereby still capturing the data without breaking scope.
How?
The best way to show Armory’s value is to show it in action. As a demo, we’re going to do some basic recon on Twilio using the scope from their public bug bounty here: https://bugcrowd.com/twilio. Keep in mind that this scope may change and we aren’t responsible for your own due diligence when hunting bugs.
For the sake of this demo, the key parts are:
In scope:
- *.authy.com
- Any host/web property verified to be owned by Twilio (domains/IP space/etc.)
- api.twilio.com
- *.twilio.com
Out of scope:
- All Third party hosted services, such as support.twilio.com are explicitly out of scope.
- Ytica and its assets are explicitly out of scope.
- SendGrid and its assets are explicitly out of scope.
Setting Up a New Environment
First things first, we’ll need to install Armory. The easiest method for this is to just use python’s pip. Create the virtual environment of your choice, then run:
[code]
pip install depth-armory
[/code]
Next, we’ll configure a new environment. Run Armory once to generate the basic configs.
[code]
armory -lm
[/code]
This will give you a full list of the default Armory modules, as well as create a basic configuration environment inside “~/.armory”. We’ll modify the “base_path” line in “~.armory/settings.ini” to point to a new directory for our Twilio testing.
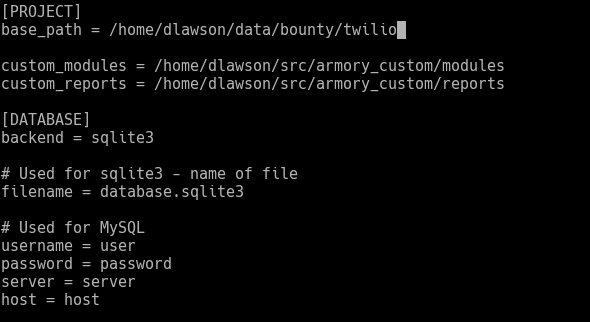
A couple of notes – “base_path” does not need to be created beforehand. The path will be created on the next run. The “custom_modules” and “custom_reports” configurations point to folders with customized modules and reports. This is optional; we use a whole suite of custom reports and modules as part of our standard penetration testing methodology.
Also, in the “.armory” folder you will see sample configs autogenerated for all the installed modules. You can rename these from “module.ini.sample” to “module.ini” and fill in any default parameters you wish.
Now, let’s add in our two domains (authy.com and twilio.com) as active scope. We want to find what subdomains and networks belong to Twilio so we can also add those in active scope. After this we’ll also manually go in and remove the stuff that is out of scope.
The basic syntax to run a module is:
[code]
armory -m Module ModuleOptions
[/code]
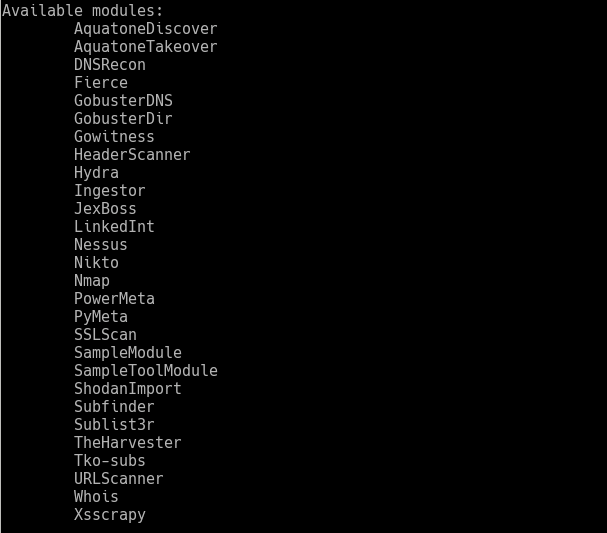
You can get a full list of modules with:
You can also get full help on what options a module supports with:
[code]
armory -m Module -M
[/code]
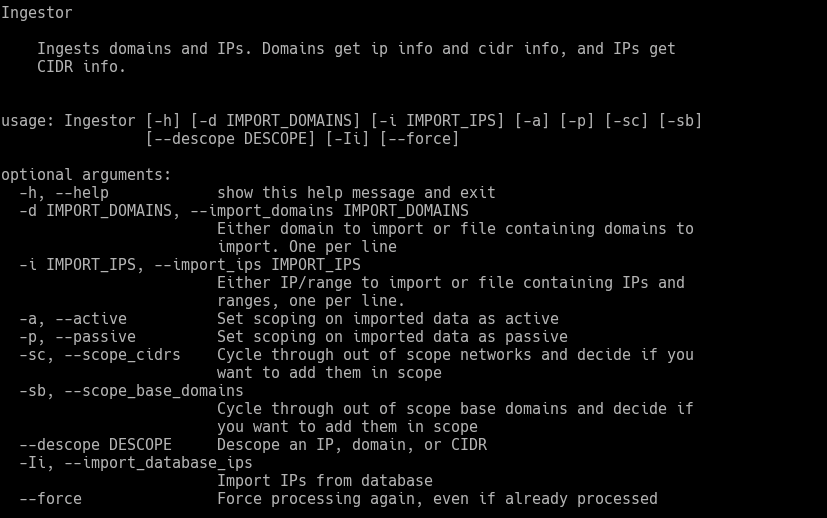
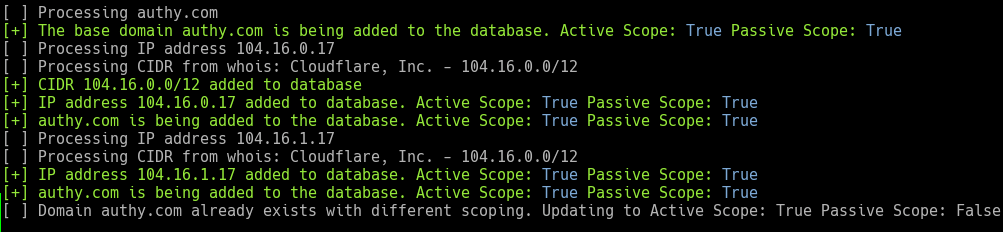
The first module we’ll use is “Ingestor”. This module is used for importing domain and IP data directly into the database as well as managing target scoping. We’ll explicitly mark the domains as “Active” and “Passive” scope. You will notice that the “Ingestor” module adds the domain to the database, resolves any IP addresses and conducts a “whois” lookup on the IP addresses to document the CIDR registration.
[code]
armory -m Ingestor -d authy.com -a -p
[/code]
[code]
armory -m Ingestor -d twilio.com -a -p
[/code]
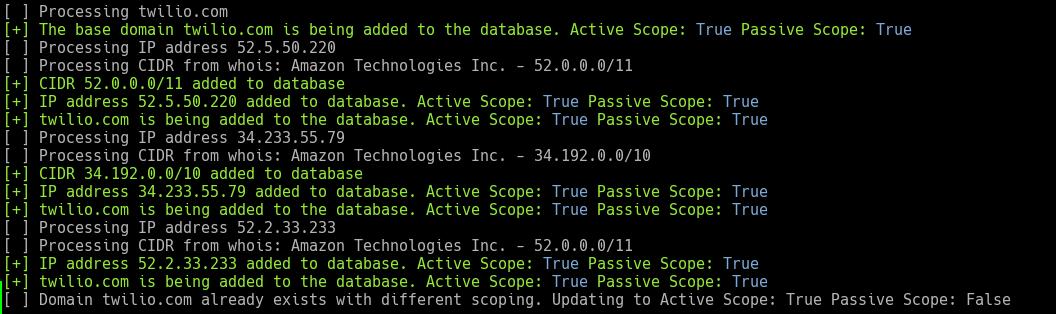
Now that both base domains are in the database and marked as “Active” and “Passive”, let’s run “Sublist3r” on them. By default, Armory threads most tools with 10 threads, so both domains will be resolved concurrently. The “-i” option imports any base domains from the database that are scoped “Passive” and have not had the tool “Sublist3r” already run.
[code]
armory -m Sublist3r -i
[/code]

Let’s also run Aquatone Discover on the two domains. We don’t want to use Aquatone’s brute forcing, so we’ll use the “–tool_args” argument to pass in an extra command. Any arguments after “–tool_args” get passed directly to the tool being called.
[code]
armory -m AquatoneDiscover -i –tool_args –wordlist=/dev/null
[/code]

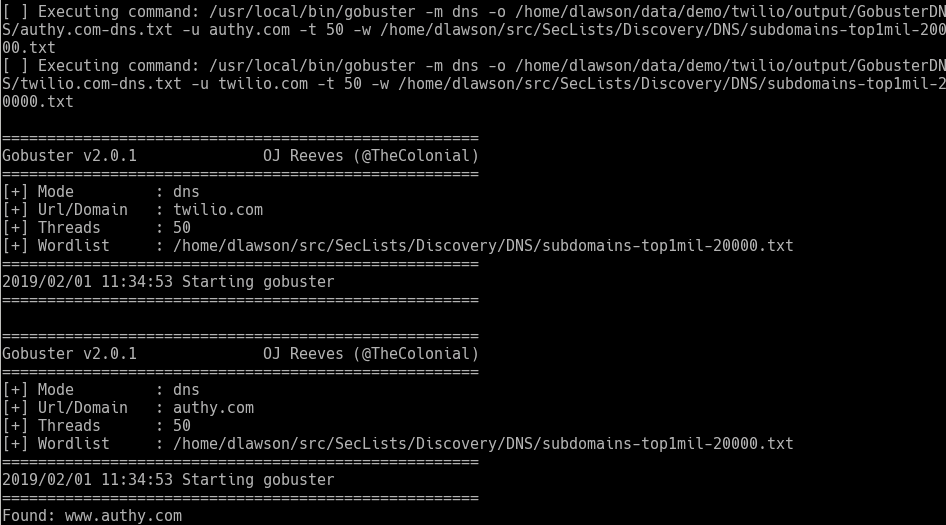
Finally, we’ll just run through a quick brute force to make sure we haven’t missed any domains. We’ll use “Gobuster’s” DNS functionality and subdomains-top1mil-20000.txt from the SecLists project.
[code]
armory -m GobusterDNS -i –tool_args -t 50 -w ~/src/SecLists/Discovery/DNS/subdomains-top1mil-20000 -fw
[/code]
Just for the sake of completeness, we’ll also run “Subfinder.”
[code]
armory -m Subfinder -i
[/code]
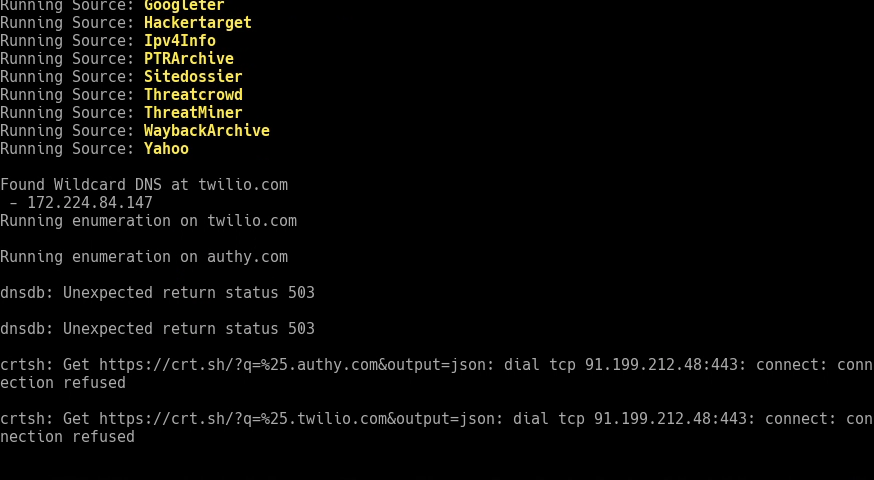
We’ve enumerated a lot of subdomains, and everything inherited the scoping from the base domains. Since Armory automagically resolves subdomains and queries “whois” for the IPs, the data is all organized by the most specific CIDR notation returned by “whois”.
Now it is time to go through the results and remove out-of-scope results from the “Active” scope. The first thing we’ll do is get a look at what our current IP map looks like. To do this, we’ll use a report called “CidrReport”, which will spit out domain and IP information sorted by CIDR:
[code]
armory -r CidrReport -p
[/code]
Results: https://gist.github.com/fang06…
Looking through the results, we see some sort of wildcard resolution pointing to Akamai. We will descope the Akamai sites, since most scanning on those tends to get your IP black-listed. We’ll also remove the Salesforce, Oracle, Sendgrid, DosArrest, and Tiggee networks. To make this easier, we’ll use the interactive Python environment to change the hosts manually.
First fire up the Python interpreter:
[code]
armory-shell
[/code]
From here we have direct access to several objects, which represent the various database tables: Domains, BaseDomains, IPAddresses, CIDRs, Users, Creds, Vulns, Ports, URLs, ScopeCIDRs
To query records from a table, use the .all() function. For example, to get all the CIDR records with the org_name of “SendGrid, Inc.”, we use:
[code]
cidrs = CIDRs.all(org_name=’Sendgrid, Inc.’)
[/code]
This then returns a list with the three records. We can then use SQLAlchemy’s built in relationships to traverse the records and mark all the IPs and domains under that CIDR as not in scope:
[code]
for c in cidrs:
for i in c.ip_addresses:
i.passive_scope = False
i.in_scope = False
i.update()
for d in i.domains:
d.passive_scope = False
d.in_scope = False
d.update()
[/code]
Finally, we commit the changes to the database. Each of the table objects has a commit() method for saving, and this is required to make the changes permanent.
[code]
CIDRs.commit()
[/code]
Next, we do the same with the remaining CIDRs.
[code]
cidrs = CIDRs.all(org_name=’Salesforce.com’)
cidrs += CIDRs.all(org_name=’Oracle Corporation’)
cidrs += CIDRs.all(org_name=’Non-Public Subnet’)
cidrs += CIDRs.all(org_name=’DosArrest’)
cidrs += CIDRs.all(org_name=’Akamai Technologies, Inc.’)
cidrs += CIDRs.all(org_name=’A100 ROW GmbH’)
for c in cidrs:
for i in c.ip_addresses:
i.passive_scope = False
i.in_scope = False
i.update()
for d in i.domains:
d.passive_scope = False
d.in_scope = False
d.update()
CIDRs.commit()
[/code]
Now that sites we should not be touching are removed from scope, let’s add in the Twilio CIDR ranges as “in-scope”. The easiest way to do this is to import them with the “Ingestor” module. This will add them to the “ScopeCIDRs” table. The reason Armory doesn’t just use one table (CIDRs) for both types is due to the sometimes large CIDR blocks you will receive from “WHOIS”.
NOTE: “Active” and “Passive” scoping doesn’t apply to IP blocks imported via “Ingestor” as they are all considering “Active” scope.
[code]
armory -m Ingestor -i 34.203.250.0/23
armory -m Ingestor -i 54.172.60.0/23
armory -m Ingestor -i 54.172.63.128/26
armory -m Ingestor -i 67.213.136.0/22
[/code]
Now that we have the scoping pretty much sorted out, our next step is to enumerate ports and services. With Armory, we have three possible ways of going about this: “Nmap”, “Nessus”, or “Shodan”. We are going to use “Shodan” to start off with since it will be the fastest and quietest. After adding our API key to the Shodan.ini file, we tell Armory to import all IPs from “Shodan”. This will try every IP in the imported blocks one at a time and import in anything that returns results.
[code]
armory -m ShodanImport -i
[/code]

After this runs for a bit, we have a lot of discovered web services. Let’s run “Gowitness” on all of them!
[code]armory -m Gowitness -i[/code]
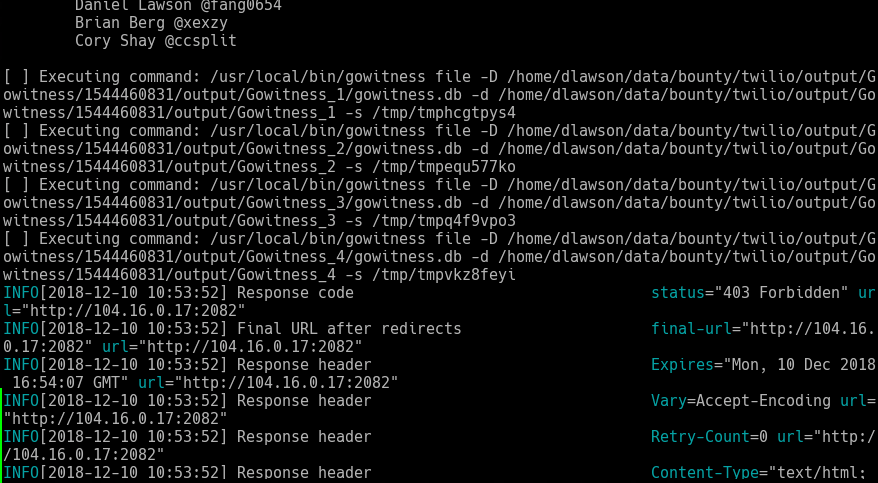
For large engagements, loading a “Gowitness” report with a few (tens of) thousand results into your browser can be a bit unwieldy. By default Armory splits the web services into blocks of 300 (there is an option to fine-tune this).
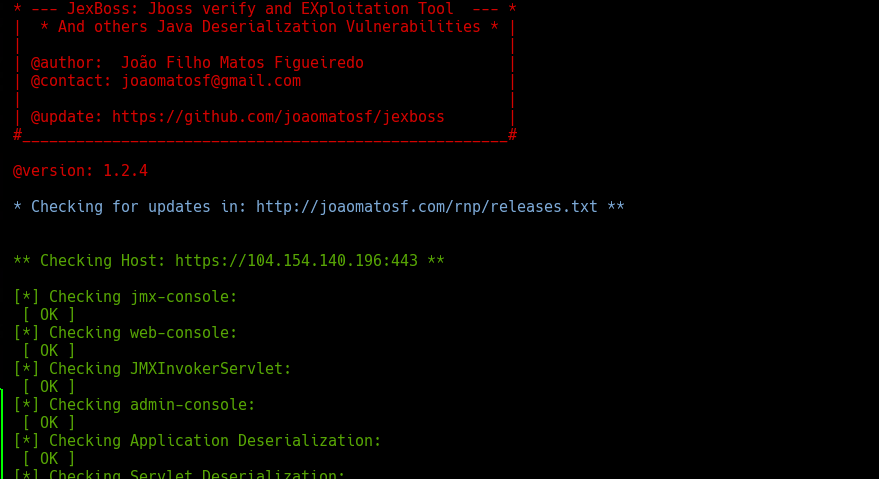
From here we can run several modules. We can use the “GobusterDir” module to mass run “Gobuster’s” directory brute forcing against all the web servers. We can try “Hydra” to try default credentials against all sorts of different services. For fun, we’ll run the “JexBoss” module, which runs the “JexBoss” tool which will check for JBoss and Struts vulnerabilities.
[code]
armory -m JexBoss –binary ~/src/jexboss/jexboss.py -i
[/code]
Conclusion
Armory has drastically increased my own productivity and enabled me to spend time doing what I really want – getting my hands dirty and looking for security bugs. I can quickly and easily get the low-hanging fruit out of the way, and even quickly code up custom modules for additional tools I decide to use later on down the road. I only briefly touched on the reporting, but by using custom reports, it is trivial to produce output that is report-ready.
This isn’t an autopwn setup. You still need to be intelligent and attack wisely. It helps to know the techniques and options used by each tool you’re running. Armory just cuts down on the wasted time of dealing with disparate output in the form of text files. If you would like more details and information on how Armory works, head on over to https://github.com/depthsecurity/armory.